So, you're thinking about setting up remote access for your Raspberry Pi behind a router using Windows 10, and you don't want to spend a dime? Smart move, friend. Let me tell you, this setup opens up a world of possibilities—whether you're running a home server, automating tasks, or even building your own IoT ecosystem. But before we dive into the nitty-gritty, let me break it down for you in plain English: remote access is all about controlling your Raspberry Pi from anywhere in the world, without needing to be physically present. And guess what? You can do it for FREE!
Now, I know what you're thinking. "Isn't this some kind of complicated tech wizardry?" Nah, not really. Sure, it might sound intimidating at first, but with the right steps, anyone can pull it off. The beauty of Raspberry Pi is its versatility and the massive community backing it up. From setting up port forwarding to using tools like SSH or VNC, we're going to make this process as smooth as butter.
But here's the deal: we're not just throwing random instructions at you. We're going to walk through everything step-by-step, with plenty of tips and tricks to keep you on track. By the time you're done reading, you'll be ready to remotely control your Pi like a pro. Let's get started, shall we?
Read also:Julia Roberts Erin Brokovich The Untold Story Of Strength And Resilience
Table of Contents:
- What is Raspberry Pi?
- Setting Up Remote Access Overview
- Port Forwarding on Your Router
- SSH Setup for Raspberry Pi
- VNC Connection for GUI Access
- Using Dynamic DNS for Easy Access
- Security Tips for Remote Access
- Tools You'll Need
- Troubleshooting Common Issues
- Wrapping It Up
What is Raspberry Pi?
Let's start with the basics. The Raspberry Pi is more than just a tiny computer—it's a game-changer for makers, hobbyists, and tech enthusiasts everywhere. Think of it as a mini PC that fits in your pocket but packs enough power to handle everything from basic computing tasks to complex projects. Whether you're building a media center, a smart home hub, or even a retro gaming console, Raspberry Pi is your go-to device.
Now, here's the kicker: the Pi is super affordable. You can get one for under $50, and it comes with tons of features that you'd expect from a full-fledged computer. Plus, it's compatible with a wide range of software, making it incredibly versatile. If you're new to the world of Raspberry Pi, don't worry—we've got you covered. Here's a quick rundown of what you need to know:
Raspberry Pi Specs
Name: Raspberry Pi
Release Date: February 2012 (Original Model)
Operating System: Raspberry Pi OS, Linux-based distributions
Read also:396402679224247262281237312435123982751512364354861242724515332353014912398125221247312463123923346433021300281239820581242472183938988
Processor: Broadcom BCM2835 (varies by model)
RAM: 512MB to 8GB (depending on the model)
Connectivity: Wi-Fi, Bluetooth, Ethernet
Setting Up Remote Access Overview
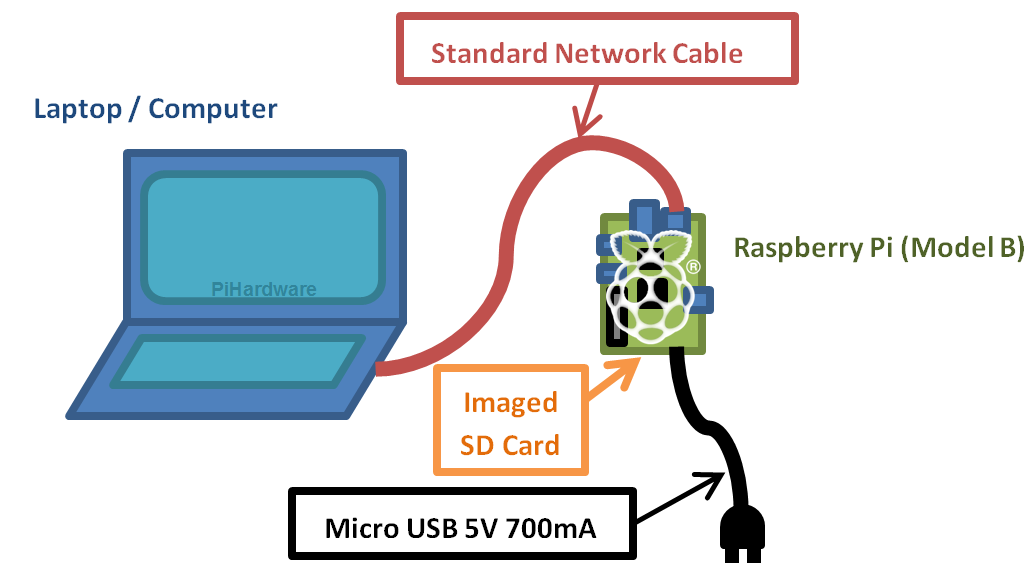
Alright, let's talk about the big picture. When you want to remotely access your Raspberry Pi behind a router, there are a few key steps you need to follow. First, you'll need to configure your router to allow incoming connections. Next, you'll set up SSH or VNC on your Raspberry Pi to enable remote communication. Finally, you'll use a dynamic DNS service to make your Pi accessible from anywhere in the world.
Here's the thing: remote access isn't just about convenience—it's also about security. You'll need to take extra precautions to ensure that your Pi doesn't become an open door for hackers. But don't sweat it—we'll cover all the security tips you need to stay safe.
Port Forwarding on Your Router
Port forwarding might sound like a mouthful, but it's actually pretty straightforward. Think of your router as a bouncer at a club. By default, it blocks all incoming traffic to keep your network secure. But if you want to access your Raspberry Pi from outside your home network, you need to tell the router to let certain traffic through.
Here's how you do it:
- Log in to your router's admin panel. Usually, you can do this by typing "192.168.1.1" or "192.168.0.1" into your browser.
- Find the "Port Forwarding" or "Virtual Servers" section in your router's settings.
- Create a new rule and specify the port number you want to forward. For SSH, use port 22; for VNC, use port 5900 or higher.
- Set the internal IP address of your Raspberry Pi as the destination.
Once you've set up port forwarding, your router will know exactly where to send incoming requests. Easy peasy, right?
SSH Setup for Raspberry Pi
SSH (Secure Shell) is your best friend when it comes to remote access. It allows you to connect to your Raspberry Pi via the command line, which is perfect for managing files, running scripts, or configuring settings. Best of all, SSH is already built into Raspberry Pi OS, so you don't need to install anything extra.
To enable SSH on your Raspberry Pi:
- Open the Raspberry Pi Configuration tool by typing "sudo raspi-config" in the terminal.
- Select "Interfacing Options" and then enable SSH.
- Reboot your Pi to apply the changes.
Now, from your Windows 10 machine, you can use a tool like PuTTY to connect to your Pi via SSH. Just enter your Pi's local IP address and the port number (22 by default), and you're good to go.
VNC Connection for GUI Access
Not everyone is a fan of the command line. If you prefer a graphical interface, VNC is the way to go. VNC lets you control your Raspberry Pi's desktop remotely, just like sitting in front of it. Plus, it's completely free!
Here's how to set it up:
- Install the RealVNC server on your Raspberry Pi by running "sudo apt install realvnc-vnc-server" in the terminal.
- Enable VNC by going to the Raspberry Pi Configuration tool and selecting "Interfacing Options."
- Download the RealVNC Viewer app on your Windows 10 machine.
- Connect to your Pi using its local IP address and the VNC port (usually 5900).
Voilà! You now have full GUI access to your Raspberry Pi from anywhere in the world.
Using Dynamic DNS for Easy Access
One of the biggest challenges with remote access is that your home IP address might change from time to time. That's where dynamic DNS (DDNS) comes in. DDNS services assign a fixed domain name to your changing IP address, so you can always connect to your Pi without worrying about updates.
There are several free DDNS providers out there, like No-IP and DuckDNS. Here's how to set one up:
- Sign up for a free account on your chosen DDNS provider.
- Create a new hostname and link it to your home IP address.
- Install the DDNS client on your Raspberry Pi to keep the hostname updated automatically.
With DDNS, you'll never have to worry about losing access to your Pi again.
Security Tips for Remote Access
Security should always be top of mind when setting up remote access. Here are a few tips to keep your Raspberry Pi safe:
- Change the default SSH port to something other than 22 to avoid automated attacks.
- Use strong passwords and enable two-factor authentication whenever possible.
- Regularly update your Raspberry Pi's software to patch any vulnerabilities.
- Limit access to specific IP addresses if you're only connecting from certain locations.
Remember, a little extra effort now can save you a lot of headaches later.
Tools You'll Need
Before you dive into setting up remote access, make sure you have all the necessary tools:
- Raspberry Pi with Raspberry Pi OS installed
- A router with port forwarding capabilities
- A Windows 10 machine with PuTTY or RealVNC Viewer installed
- A DDNS account from a provider like No-IP or DuckDNS
With these tools in hand, you're ready to rock and roll.
Troubleshooting Common Issues
Even the best-laid plans can hit a snag. Here are a few common issues you might encounter and how to fix them:
- Can't connect via SSH: Double-check your port forwarding settings and ensure SSH is enabled on your Pi.
- VNC connection fails: Make sure the VNC server is running on your Pi and that the correct port is forwarded on your router.
- DDNS not updating: Verify that your DDNS client is installed and configured correctly on your Pi.
If all else fails, don't hesitate to reach out to the Raspberry Pi community or forums for help.
Wrapping It Up
There you have it—a comprehensive guide to setting up remote access for your Raspberry Pi behind a router on Windows 10 for free. Whether you're using SSH for command-line access or VNC for GUI control, you now have the tools and knowledge to take your projects to the next level.
But remember, with great power comes great responsibility. Always prioritize security and stay informed about the latest best practices. And if you found this guide helpful, drop a comment below or share it with your friends. Together, let's keep the spirit of innovation alive!