Have you ever admired the beauty of a rose and thought about capturing its elegance on paper? A stunning and easy drawing of a rose a beginners guide can help you achieve that goal. Whether you're a seasoned artist or just starting out, learning how to draw a rose is an exciting journey. Roses are not only symbols of love and beauty but also a great way to improve your artistic skills. This guide will walk you through the process step-by-step, ensuring you can create a masterpiece with ease.
Drawing a rose might seem intimidating at first, but with the right techniques and tools, it becomes an enjoyable and rewarding experience. This stunning and easy drawing of a rose a beginners guide is designed to break down complex concepts into manageable steps. From understanding the anatomy of a rose to mastering shading and texture, we'll cover everything you need to know. Whether you're using pencils, pens, or digital tools, this guide will cater to your specific needs and preferences.
Before diving into the details, it's important to remember that practice makes perfect. Even the most accomplished artists started as beginners, and every stroke of the pencil is a step forward. This guide will not only teach you the technical aspects of drawing but also inspire you to explore your creativity. So, grab your sketchbook, sharpen your pencils, and let's embark on this artistic adventure together!
Read also:Alyssa Milano Opens Up About Her Mental Health Journey
Table of Contents
- 1. What Makes a Rose So Challenging to Draw?
- 2. Understanding the Anatomy of a Rose
- 3. Choosing the Right Tools for Your Drawing
- 4. How to Start Your Stunning and Easy Drawing of a Rose?
- 5. Tips for Adding Depth and Texture to Your Rose
- 6. Common Mistakes Beginners Make When Drawing a Rose
- 7. Can You Draw a Rose Digitally?
- 8. FAQs About Drawing Roses
What Makes a Rose So Challenging to Draw?
Drawing a rose can be both exhilarating and challenging for beginners. The intricate details of the petals, the way they overlap, and the subtle curves make it a complex subject. However, understanding the reasons behind these challenges can help you overcome them more effectively.
One of the primary difficulties lies in the asymmetrical nature of a rose. Unlike geometric shapes, roses have organic forms that vary from one bloom to another. This unpredictability requires artists to observe closely and adapt their techniques accordingly. Additionally, capturing the delicate transitions between light and shadow can be daunting, especially for those new to shading.
Another factor is the layering of petals. A rose is not a single entity but a collection of overlapping petals that create depth and volume. Learning how to depict this layering without making the drawing look cluttered is a skill that takes time to master. By breaking down these challenges into smaller, manageable tasks, you can gradually build confidence in your ability to draw roses.
How Can You Simplify the Process?
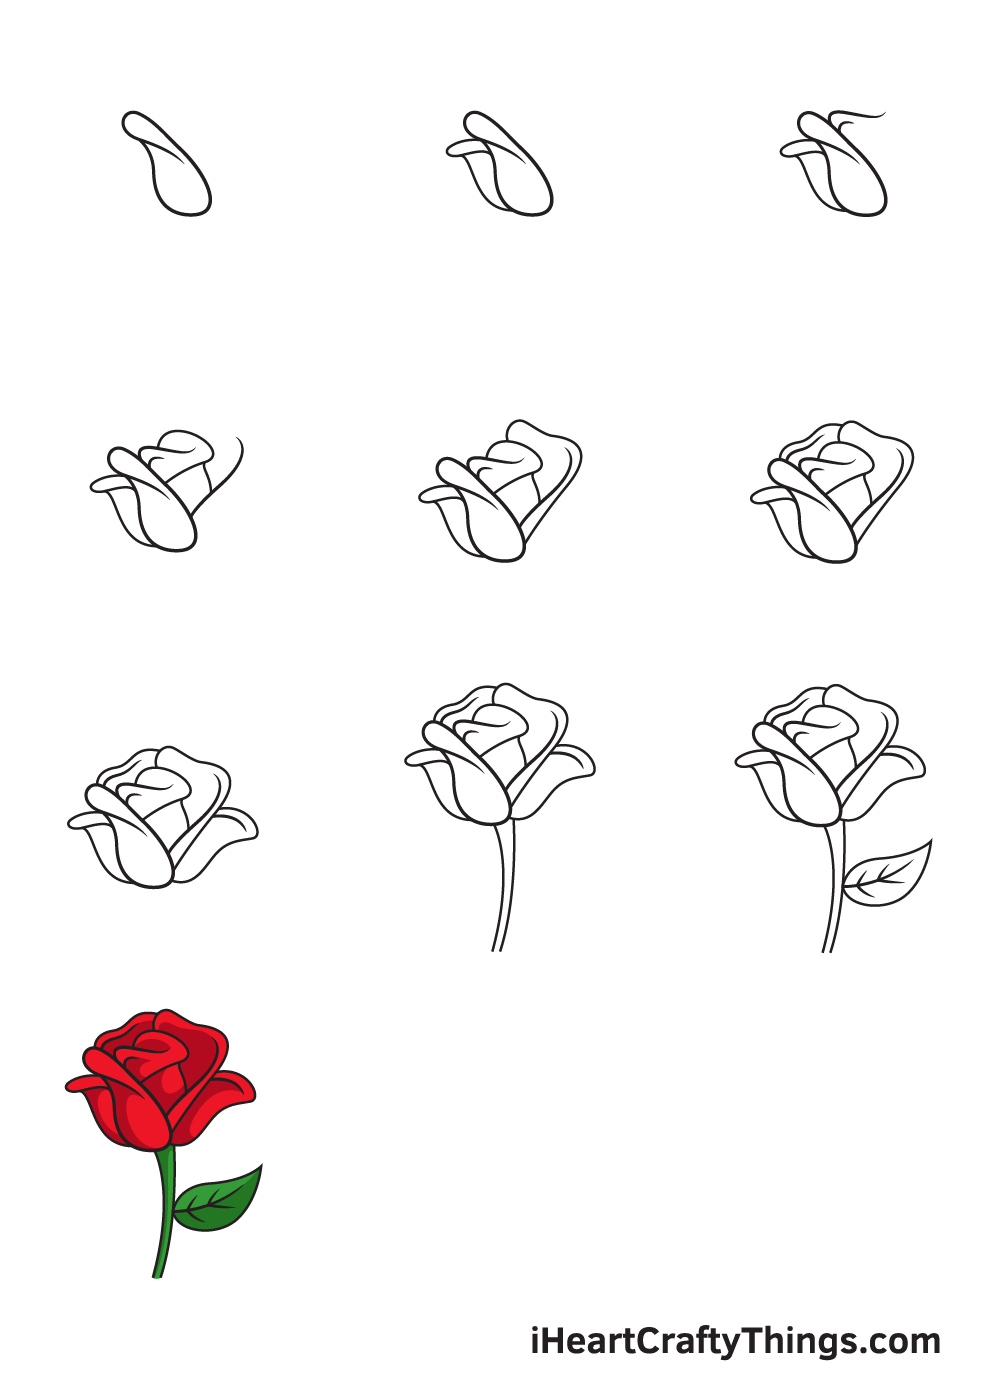
Simplifying the process involves focusing on the fundamentals. Start by sketching basic shapes that represent the overall structure of the rose. For instance, you can begin with an oval for the center and add layers of petals around it. This approach allows you to establish the foundation before delving into the finer details.
Additionally, practicing gesture drawing can help you capture the essence of a rose quickly. Gesture drawing involves rapid sketches that emphasize movement and flow rather than precision. This technique trains your hand and eye to work together, making the transition to detailed drawings smoother.
Why Should You Embrace Imperfections?
Perfection is not the goal when drawing a rose. In fact, imperfections add character and realism to your artwork. Nature itself is full of irregularities, and replicating these nuances can make your drawing more lifelike. Embracing imperfections also reduces pressure, allowing you to enjoy the creative process more fully.
Read also:Mary Mouser Erome Unveiling The Star Beyond The Spotlight
Understanding the Anatomy of a Rose
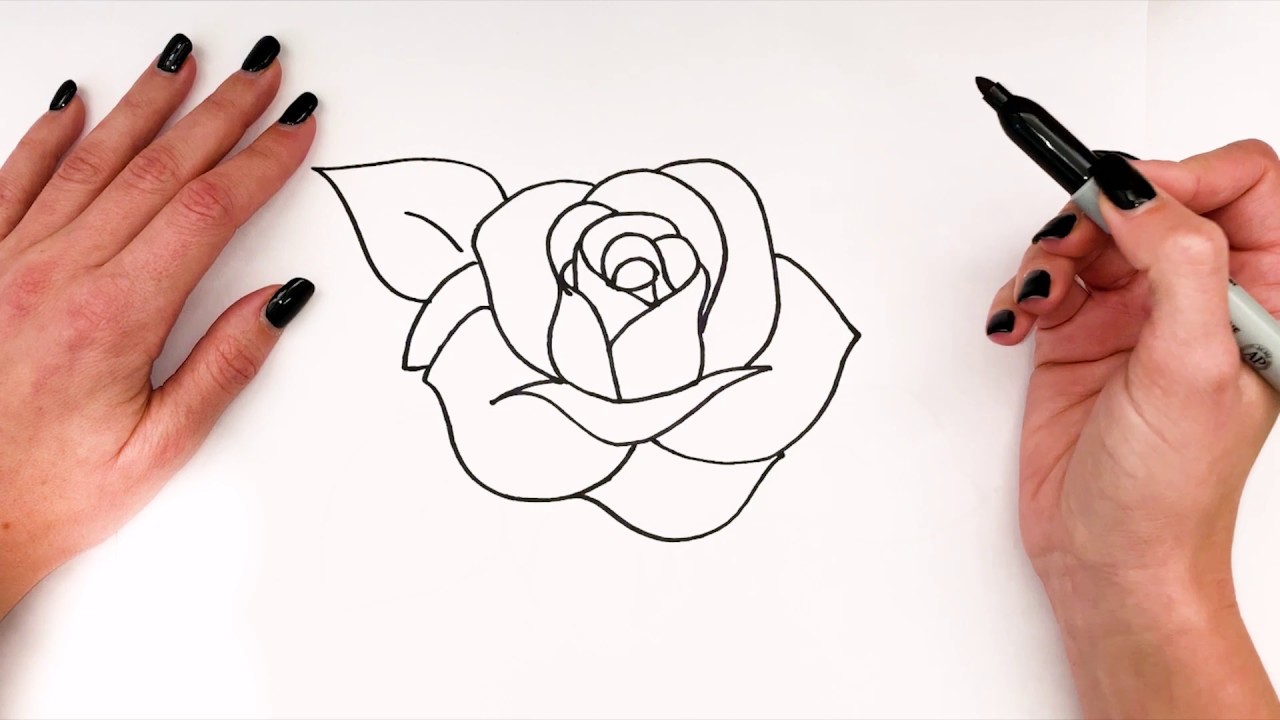
To create a stunning and easy drawing of a rose, you must first understand its anatomy. A rose is composed of several key parts, each contributing to its overall appearance. By familiarizing yourself with these components, you can ensure your drawing is both accurate and visually appealing.
The center of the rose, often called the "heart," is where the petals originate. This part is typically small and tightly packed, forming a spiral-like structure. Surrounding the heart are the inner petals, which are usually smaller and more delicate. These petals gradually increase in size as they move outward, creating a sense of depth.
Outer petals are larger and more prominent, often curling at the edges. They provide the rose with its iconic shape and protect the inner petals. The sepals, located at the base of the flower, are leaf-like structures that support and enclose the bud before it blooms. Understanding the role of each part will help you depict the rose more authentically.
What Are the Key Features to Focus On?
When drawing a rose, focus on the following key features:
- Petals: Pay attention to their shape, size, and arrangement. Notice how they overlap and create layers.
- Stem: The stem should be drawn with gentle curves to give it a natural appearance. Don't forget to include thorns if desired.
- Leaves: Leaves add balance to the composition. They are typically arranged in pairs along the stem and have serrated edges.
How Can You Study Real Roses?
Studying real roses is one of the best ways to improve your drawing skills. Visit a garden or purchase fresh roses to observe their structure up close. Take note of how light affects the petals, creating highlights and shadows. You can also photograph roses from different angles to use as reference material later.
Choosing the Right Tools for Your Drawing
Selecting the right tools is crucial for achieving a stunning and easy drawing of a rose. While the choice of materials depends on personal preference, certain options are better suited for beginners. Here's a breakdown of the essential tools you'll need:
Pencils: Graphite pencils are versatile and affordable, making them ideal for beginners. Start with a range of hardness levels, such as 2H, HB, and 6B, to achieve different shades and textures. Mechanical pencils are also a great option for precision work.
Paper: Choose a smooth surface for detailed drawings. Bristol board or sketch paper with a weight of 90-140 pounds works well. If you prefer a textured effect, consider using watercolor paper.
Erasers: Invest in a kneaded eraser for blending and a plastic eraser for precision. These tools allow you to correct mistakes and add highlights effectively.
Should You Use Digital Tools?
While traditional tools are excellent for learning the basics, digital tools offer unique advantages. Programs like Adobe Illustrator or Procreate provide features like layers, undo options, and customizable brushes. If you're interested in digital art, explore these platforms to enhance your skills.
What Are Some Affordable Options?
For those on a budget, there are plenty of affordable options available. Look for starter kits that include a variety of pencils, erasers, and sharpeners. Online retailers often offer discounts on bulk purchases, allowing you to stock up without breaking the bank.
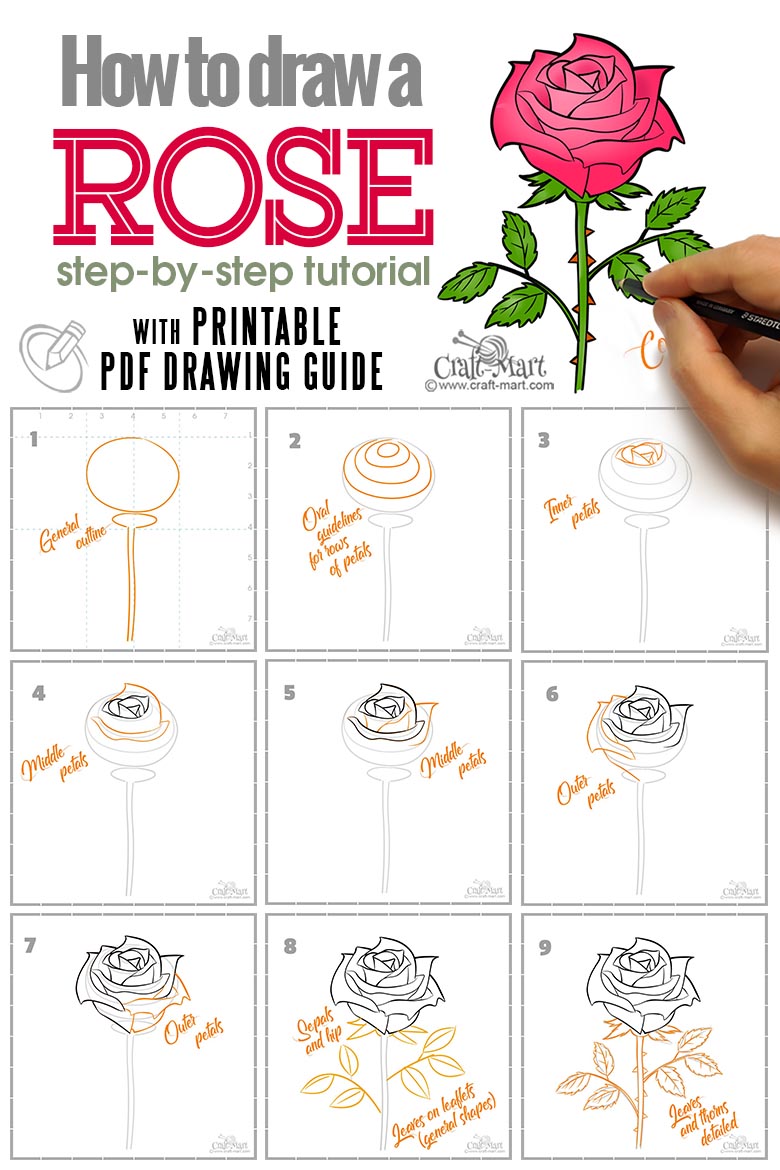
How to Start Your Stunning and Easy Drawing of a Rose?
Starting your drawing can be the most intimidating part, but with a clear plan, it becomes much easier. Begin by sketching a rough outline of the rose using light, loose strokes. This initial sketch serves as a guide for placing the major elements of the flower.
Once the outline is complete, refine the shapes of the petals, stem, and leaves. Pay close attention to proportions and ensure each part is in harmony with the others. If you're unsure about a particular detail, refer to your reference material or make adjustments as needed.
After establishing the basic structure, start adding details. Begin with the heart of the rose and work outward, gradually building up the layers of petals. Use short, deliberate strokes to mimic the texture of the petals and create a sense of realism.
What Techniques Should You Use?
Several techniques can enhance your drawing:
- Hatching: Parallel lines used to create shading and texture.
- Cross-hatching: Overlapping lines for darker tones.
- Stippling: Small dots to build up value and texture.
How Can You Practice Consistently?
Consistency is key to improving your skills. Set aside dedicated time each day for practice, even if it's just 15 minutes. Over time, you'll notice significant progress in your ability to draw roses. Joining online communities or attending art classes can also provide motivation and feedback.
Tips for Adding Depth and Texture to Your Rose
Adding depth and texture transforms a flat drawing into a three-dimensional masterpiece. Start by identifying the light source and determining where the highlights and shadows will fall. Use a combination of shading techniques to create contrast and dimension.
For petals, focus on the edges where they curl or overlap. These areas tend to catch more light, creating subtle highlights. Conversely, the areas where petals meet or fold inward are darker, adding depth to the drawing. Experiment with different pressures and strokes to achieve the desired effect.
Texture is equally important. Use stippling or cross-hatching to mimic the velvety surface of the petals. For the stem and leaves, incorporate hatching to simulate the roughness of the bark or the serrated edges of the leaves.
Common Mistakes Beginners Make When Drawing a Rose
Every beginner makes mistakes, but recognizing them early can prevent frustration. One common error is overworking the drawing, leading to a cluttered appearance. Resist the urge to add every detail at once; instead, focus on the most important elements first.
Another mistake is neglecting the negative space around the rose. This space plays a crucial role in defining the shape and form of the flower. By paying attention to both positive and negative space, you can create a balanced composition.
Finally, avoid relying too heavily on reference material. While it's helpful to study real roses, your drawing should reflect your unique interpretation. Strive to inject your personality into the artwork, making it distinct and memorable.
Can You Draw a Rose Digitally?
Yes, drawing a rose digitally is not only possible but also highly rewarding. Digital platforms offer tools and features that can simplify the process and enhance your creativity. Programs like Procreate or Photoshop provide layers, undo options, and customizable brushes, giving you greater control over your artwork.
To get started, choose a digital drawing tablet that suits your needs. Options range from basic models to professional-grade devices, depending on your budget and skill level. Familiarize yourself with the software interface and experiment with different brushes and settings to find what works best for you.
FAQs About Drawing Roses
How Long Does It Take to Learn to Draw a Rose?
Learning to draw a rose varies depending on your dedication and practice frequency. With consistent effort, you can see noticeable improvement within a few weeks. However, mastering the art takes time and patience.
Do I Need Special Skills to Draw a Rose?
No, special skills are not required to start drawing a rose. Basic hand-eye coordination and a willingness to learn are sufficient. As you practice, you'll develop the skills needed to create stunning and easy drawings of roses.
Conclusion
A stunning and easy drawing of a rose a beginners guide offers a gateway to a world of creativity and self-expression. By following the steps outlined in this article and practicing regularly, you can achieve remarkable results. Remember, the journey is just as important as the destination. Enjoy every stroke of your pencil and let your imagination flourish!